
What are sprites anyways?
Sprites are little blocks of data that you move around the computer screen. Usually used to move the characters around the screen in games such as Mario or the barrels moving around in Donkey Kong, they are sprites. If you are making a game or a demo on the CoCo then you are left with the job of writing assembly code that moves your game data/characters around the screen using the CPU. The CoCo doesn’t have hardware sprites so it’s all up to the processor. So the faster we can move sprites around the better. This might free up CPU cycles so you can add more sprites to your game or add sound.
There are many ways to move your character data around the screen on a CoCo:
- Where you load (LDD ,X) the character data from memory and store (STD ,U) the same data somewhere in video RAM.
- Faster is to stack blast. This method is where you point the S stack pointer to the character data from memory and the U stack pointer to where in the video RAM you want your data to end up. Then you do a PULS D,X,Y and PSHU D,X,Y. You also must keep track of the order of your data using this method and where in video RAM you are Pushing the data.
- Compiled sprites are even faster. It is actual code that draws the character on screen directly. The code is a lot of LDD or LDA instructions with a bunch of STD ,X where you point X to the address you want your sprite to be in video RAM.
- Compiled/blasted sprites do the same as compiled sprites, but the sprite is drawn from the bottom up and whenever it’s possible instead of STD ,X you do a PSHU D,X,Y or similar. Pushing is faster then Storing.
What is a sprite compiler?
A sprite compiler takes your character data in the binary format that would be loaded and then stored on the screen and turns that data into assembly code that when executed writes the sprite data to the screen very fast.
Here is an example source picture and what the compiled sprite code looks like: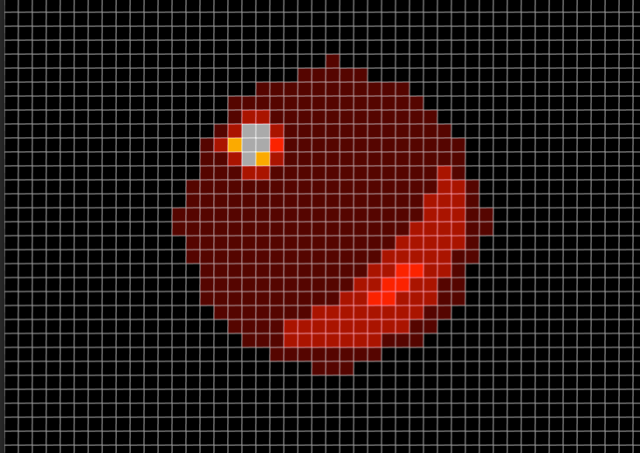
The compiled code produced using the tool created this assembly code to be used on a 16 colour, 256 pixel wide screen. Using the stack it’s best to work from the bottom row up.
**************************************************
* 00 00 00 00 FF FF 00 00 00 00 - 1
* 00 00 0F FF FF FF FF 00 00 00 - 2
* 00 0F EE FF FF FF FF F0 00 00 - 3
* 00 0E 99 EF FF FF FF FF 00 00 - 4
* 00 FE AA EF FF FF FF FF F0 00 - 5
* 00 FE 99 EF FF FF FF FF F0 00 - 6
* 0F FF FF FF FF FF FF FF EF 00 - 7
* 0F FF FF FF FF FF FF FE EF 00 - 8
* FF FF FF FF FF FF FF FE EF F0 - 9
* FF FF FF FF FF FF FF EE EF F0 - 10
* 0F FF FF FF FF FF FE EE EF 00 - 11
* 0F FF FF FF FF FF EE DE EF 00 - 12
* 00 FF FF FF FF FE ED EE F0 00 - 13
* 00 FF FF FF FF EE DE EE F0 00 - 14
* 00 0F FF FF EE EE EE EF 00 00 - 15
* 00 00 FF EE EE EE EE F0 00 00 - 16
* 00 00 0F FF EE EF FF 00 00 00 - 17
* 00 00 00 00 FF F0 00 00 00 00 - 18
**************************************************
_000056.raw:
        opt     c
        opt     ct
        opt     cd
        opt     cc
* Row 17
        LEAU    128*16+7-3079,U    * A=, B=, X=, Y=
* Row 17 and row 18 700
* 00 00 0F FF EE EF FF 00 00 00
* 00 00 00 00 FF F0 00 00 00 00
        LDB     126,U           * A=, B=, X=, Y=
        ORB     #$F0            * A=, B=, X=, Y=
        STB     126,U           * A=, B=XX, X=, Y=
        LDB     -5,U            * A=, B=XX, X=, Y=
        ORB     #$0F            * A=, B=XX, X=, Y=
        STB     -5,U            * A=, B=XX, X=, Y=
        LDD     #$FFEE          * A=, B=XX, X=, Y=
        STD     -4,U            * A=FF, B=EE, X=, Y=
        STA     -1,U            * A=FF, B=EE, X=, Y=
        STA     125,U           * A=FF, B=EE, X=, Y=
        LDB     #$EF            * A=FF, B=EE, X=, Y=
        STB     -2,U            * A=FF, B=EF, X=, Y=
* Row 16 800
* 00 00 FF EE EE EE EE F0 00 00
        LEAU    -128*1,U        * A=FF, B=EF, X=, Y=
        LDA     ,U              * A=FF, B=EF, X=, Y=
        ORA     #$F0            * A=FF, B=EF, X=, Y=
        STA     ,U              * A=XX, B=EF, X=, Y=
        LDD     #$FFEE          * A=XX, B=EF, X=, Y=
        STD     -5,U            * A=FF, B=EE, X=, Y=
        STB     -3,U            * A=FF, B=EE, X=, Y=
        STB     -2,U            * A=FF, B=EE, X=, Y=
        STB     -1,U            * A=FF, B=EE, X=, Y=
* Row 15 800
* 00 0F FF FF EE EE EE EF 00 00
        LEAU    -128*1+1,U      * A=FF, B=EE, X=, Y=
        LDB     -7,U            * A=FF, B=EE, X=, Y=
        ORB     #$0F            * A=FF, B=EE, X=, Y=
        STB     -7,U            * A=FF, B=XX, X=, Y=
        LDB     #$FF            * A=FF, B=FF, X=, Y=
        LDX     #$EEEE          * A=FF, B=FF, X=EEEE, Y=
        LDY     #$EEEF          * A=FF, B=FF, X=EEEE, Y=EEEF
        PSHU    D,X,Y           * A=FF, B=FF, X=EEEE, Y=EEEF
* Row 14 800
* 00 FF FF FF FF EE DE EE F0 00
        LEAU    -128*1+6,U      * A=FF, B=FF, X=EEEE, Y=EEEF
        LDA     ,U              * A=FF, B=FF, X=EEEE, Y=EEEF
        ORA     #$F0            * A=FF, B=FF, X=EEEE, Y=EEEF
        STA     ,U              * A=XX, B=FF, X=EEEE, Y=EEEF
        LDA     #$FF            * A=FF, B=FF, X=EEEE, Y=EEEF
        LDX     #$FFEE          * A=FF, B=FF, X=FFEE, Y=EEEF
        LDY     #$DEEE          * A=FF, B=FF, X=FFEE, Y=DEEE
        PSHU    D,X,Y           * A=FF, B=FF, X=FFEE, Y=DEEE
        LDB     #$FF            * A=FF, B=FF, X=FFEE, Y=DEEE
        STB     -1,U            * A=FF, B=FF, X=FFEE, Y=DEEE
...
Why did you write such a tool?
When I was young there was a cool Amiga Demo from 1988 that I’ve always enjoyed watching, called Demons are Forever. The demo has a bunch of sprites moving around the screen and changing from a sphere to a demon character and back. It also has some cool music that plays in the background. I thought it would be cool if this demo could be played on a CoCo 3 and I would learn a lot about smooth sprite movement so I started working on replicating this demo for the CoCo 3.
While compiling the many sprites by hand I decided that this would be easier if there was a tool to do this. It wasn’t an easy program to write since creating a compressed and stack blasted sprite is pretty complicated. I wanted to make sure the program made very optimized code so the sprites are rendered as fast as possible. That’s the main reason for compiling sprites in the first place. I ended up with a program that does a VERY good job creating compiled/stack blasted sprites from a raw binary file. Looking through the assembly output that it creates I’ve been able to hand tweak a few things myself to make it a tiny bit faster. But those changes were very minimal. I figured since I found this tool useful maybe others could use it when they are working on their games and want their sprites to be as fast as possible on screen.
What format should the input file be?
The tool takes raw binary data that is the same data your normal character would use to display on the CoCo 3 screen. You need to save the binary data that represents your character and save that data to a file. You will need to know the width and height of your sprite to use it with the sprite compiler tool.
For an example my sprite above had a data file with the first four rows as:
* 00 00 00 00 FF FF 00 00 00 00 - 1
* 00 00 0F FF FF FF FF 00 00 00 - 2
* 00 0F EE FF FF FF FF F0 00 00 - 3
* 00 0E 99 EF FF FF FF FF 00 00 - 4
If you examined the input file with a hex editor the start of the file would look like this:
00 00 00 00 FF FF 00 00 00 00 00 00 0F FF FF FF FF 00 00 00 00 0F EE FF FF FF FF F0 00 00 00 0E 99 EF FF FF FF FF 00 00
Things to consider before you draw your sprite character to be used with this sprite compiler:
- For transparency the tool always uses palette 0, any other value is treated as part of the sprite.
- If you can use the palette number 15 = $F as the border/edge of your character then the compiled sprite will be drawn a little quicker. The reason for this is a little hard to explain but here goes. When the compiled sprite is being created and an edge of your sprite is one nibble in a byte and the other nibble is transparent (value of zero) then the compiler must load the byte and then do an AND $F with the nibble that has your palette. If the compiler finds the palette is already $F then it doesn’t have to do the AND instruction. Here is a little code to demonstrate this.
Byte is $07 so the right nibble is using palette 7 and the left nibble is transparent the code will look like this:
LDB     126,U   * Load B with whatever value is at this location
ANDB    #$F0    * AND the value so that we keep the transparent part
ORB     #$07    * OR the value with our colour palette
STB     126,U   * Store the new value on the screen
If we use $0F for the edge colour/palette the code looks like this no AND instruction is needed.
LDB     126,U   * Load B with whatever value is at this location
ORB     #$0F    * OR the value with our colour palette
STB     126,U   * Store the new value on the screen
What are the options for this tool?
While writing the sprite compiler tool I needed it to do many things and it seemed like everyday I was adding a new feature to it. It currently has quite a lot of options as shown below. The limitation right now is it only works with sprites that are for the CoCo 3, Hires screen with 16 colours. In this graphics mode each pixel is one nibble and that is what my sprite compiler currently handles. The compiler can handle transparencies down to the pixel (nibble) level.
Usage:
cmpblsp -wX -hY [-oswX -oshY -owX -ohY -aa] [-as] [-odd] [-sX]
 [-rXXXX] [-rvX] [-nSubroutine] [-c] [cyc] [-done] spritename
Where:
-w - X is the width in bytes for the width of the sprite
-h - Y is the number of rows for the height of the sprite
-osw - Offset used - width in bytes of the entire data file
-osh - Offset used - height of the entire data file
-ow - X offset, from the left side to where the sprite data starts
-oh - Y offset, from the top row to where the sprite data starts
-as - Autocenter, usually the top left corner of the sprite is used
      as the starting point of the sprite, this makes it the middle
-aa - Autocenter point is the middle of the entire data file
-odd - Also make an odd version of the sprite, by shifting the data
       one nibble to the right, outputs a separate _odd.asm file
-s - Sets the screen width the sprite will be used with
     (256 or 320) defaults to 320
-r - Creates a restore sprite that loads the data behind the sprite
     from address offset XXXX which is a 4 digit hex number
-rv - Creates a restore sprite that stores the value X which is a hex
      value between 0 to F. This value is substituted wherever any
      non Zero byte is in the sprite data. This is useful if the
      background behind your sprite is always a known palette, such
      as black. This is faster then having to load the background.
-n - Name of the subroutine that is created, if not used the routine
     name created will be _spritename:
-c - Add comments that shows the values of the registers
-cyc - Add cycle count instructions for lwasm
-done - When the program is complete it wont wait for you to press
        a key, the program will exit and close this window
        (useful for scripts)
sprite - This is the name of the sprite to compile
         Output name will be sprite with .asm extension added
Besides creating a compiled/blasted sprite at the Pixel level the tool can also create pixel shifted version of the sprite which allows for smooth motion on the screen. For example your sprite is drawn starting at pixel 100,100 or video RAM address $2440 (as an example) and you want it to move one pixel to the right. You can’t just point your compiled sprite at $2441 because that is actually two nibbles or pixels to the right of where the last sprite was drawn. You need to draw a new sprite since all pixel data is accounted for the even pixels only. The -odd option creates a second compiled sprite with the same name and _odd.asm on the end of the filename.
Another thing the tool can do is create two different types of restore compiled sprites. These can be used to restore the data behind a sprite as it moves across the screen. The first and easiest restore sprite is useful if your background is all the same colour palette. For example all blue. If the blue background palette is Hex C then then use would use the option-rvC. The other type of restore sprite that the tool can make is a little more complicated.
Here is how it works:
If you have a complicated background graphics screen (more then one colour) you can have a second copy of the background stored somewhere else in RAM and copy that image data back under where your sprite was previously drawn. The option -rXXXX where the XXXX is a hex number that is where the relative backup screen is stored in memory. If your backup screen is stored $6000 bytes forward in RAM then you would select the option -r6000.
The other advanced thing the tool does is allows you to select or crop the area that you want to use from your source data file. This is useful if the data you have captured is bigger then the sprite. You can set what parts of the data file are used for actual sprite data and make a compiled sprite only from that part. For example if you have some sprite data that is 21 bytes wide and 19 rows high but your character is only 5 bytes wide and 7 bytes high and starts near the middle of the data then you would use the following options. -w5 -h7 -osw21 -osh19 -ow10 -oh9
Remember that the tool defaults to creating sprites for a 320 pixel wide screen. If you need to make a sprite for a 256 pixel wide screen use the -s256 option.
What language is this program written in and how can I get it for my computer?
I wrote the program using QB64 which is a modern version of QBASIC that runs on Windows, Linux and Mac. It is very similar to Color Basic for the CoCo. If you’ve done programming on the CoCo in BASIC then I think you will feel right at home using QB64. You can download QB64 from the link here.
Once QB64 is installed you can simply copy the text version of my program from my pastebin account here:
and paste it into QB64 and create an executable version of the program to use on your computer. The program isn’t copyrighted, do whatever you want with it. The code is quite a bit messy but it gets the job done. I just hope it helps other to create more cool games for the CoCo!
I think a useful improvement would be to add support for importing the picture data as a standard file formats like BMP, GIF,PNG,TIFF and maybe some of the standard graphic formats that are native to the CoCo 3 like Color Max files. That would be better then the way it currently works which requires a raw sprite data file. QB64 does have built in graphic file import routines for many common formats so it might not be too hard to add. The problem is that you must be sure to keep the palette info intact when importing a file from a standard image format file. Feel free to improve the code…
I’ve only used the sprite compiler for my own limited use and I think it is ready for release but there might still be some bugs in it. If you find any bugs please post the details in the comments below.
I don’t currently have any plans to add other screen resolutions to the sprite compiler right now. I might go back and revisit Space Invaders and make it work without the need to rotate your screen and then I might have a chance to add to the sprite compiler. That is way in the future though…
Have fun,
Glen

Pingback: Sprites e otimizações para CoCo 3 e 6809 | Retrocomputaria
I know this is an old post BUT
I have tried and tried a number of different times to use your sprite compiler.
Downloaded and install QB64 – no problems
Compiled your .BAS program – no problems
Built a short sprite (RAW) 8*4 just for testing using “Hex Editor Neo”
Open CMD prompt window
enter — cmpblsp -w8 -h4 Short.bin
All I get is window with default “How to use screen”
cmpblsp -1.– by Glen Hewlett
etc
etc
etc
Press any key
I have tried with
various parms
various extensions
various RAW data files
But always get same result.
Have your .exe and input file is same dir
Any suggestions or a sample RAW file?
Thanks in advance
George